Video Camera Review of the Panasonic NVGS280 Digital Camcorder
We bought a new Mini DV digital video camera (camcorder)
just prior to our 2006 Somerset holiday. Here's our review...
Also: camcorder
review article updates | camcorder website links
Other product reviews | Smartphone | Android Apps | Two Way Radios | Digital Camera | GPS
Sat Nav receiver | Talkie Walkies
This review assumes a basic understanding
of the appropriate technology. Reviewed October 2006.
This Panasonic Digital
Camcorder article has been updated with our latest findings in
following years.
This page should now be considered an
archive resource (although the principles may still apply).
Background to our purchase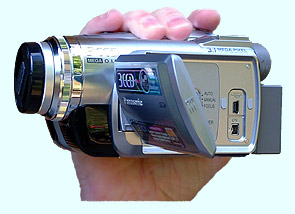
Just the day before our 2005 Dorset
holiday we discovered that our trusty JVC DV1 digital camcorder
recorded no sound, forcing us to drag out of mothballs our aged 12 year
old Sony analogue Hi8 model. So a few weeks prior to our 2006 Somerset holiday we researched a
suitable replacement on the Internet and in the consumer press.
We wanted to stick with the Mini DV tape format - footage is easier to
transfer and edit on the computer and we need to play our existing tape
collection - plus we required something lightweight. The
Panasonic NVGS280 digital video camera seemed to fit the bill, we
particularly liked the high quality credentials and hybrid built-in
digital stills camera which we hoped would save us from carrying and
operating two cameras - video and still - on our travels...
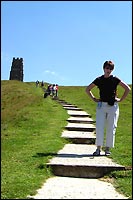
Above right. Mike holds the camcorder in his
hand. Note that better performance can be achieved by removing the lens
cap!
Internet order
Searching the Internet turned up a number of suppliers,
unfortunately with the model out of stock at many. We then
discovered it in stock at a retailer we've used in the past - PRC Direct, and
at a good price too, so we ordered. While waiting the few days
for delivery we downloaded the instruction manual from the Panasonic
website to familiarise ourselves with it. We thought it
prudent to have a second rechargeable battery, so another online search
for a supplier and we ordered from Battery Force (and at one-third the
Panasonic price!) - it arrived next day. We did the same for some
DV tapes, found Postfree.biz and got branded Panasonic tapes at half
High Street prices (both suppliers now defunct). Finally we
ordered some SD memory cards, a UV filter and lens cap from 7 Day Shop.com, a
dealer we use regularly.
Panasonic NVGS280 hybrid digital camcorder features
Panasonic makes much of the camera's high quality credentials
- 3CCD's, Leica Dicomar lens and Crystal Engine. Other major
features include an Optical Image Stabiliser (OIS), Anti-Ground
Shooting (AGS), 10x optical zoom, manual overrides, colour night view,
and a 3.1 megapixal (mpx) digital stills mode using SD card
media. It has a foldout 2.7 inch dynamic LCD screen and
viewfinder (both colour), zoomable mic with wind cut filter, widescreen
recording and two tape speeds. Connections are provided for USB
and DV (FireWire), S-Video and stereo sound out and external mic in.
Setting up decisions
We like to get the best out of our kit, so we spent some time
experimenting with the various video, sound and stills settings on our
new camcorder:
SP/LP - The LP speed allows a 60 min
Mini DV tape to run for 90 mins. The user guide indicates there's
no quality drop at the lower speed, but warns of possible pixel
blocking, particularly with non Panasonic tape and of poor slow motion
playback. We tried it on LP with another DV tape brand (ooh er!)
and even during rapid pans and zooms of buildings (a good stress test
of digital video encoding), there were no picture or playback
problems. However, we noticed the sound (16 bit) seemed a bit
more woolly and there were sound glitches at some stop/start
points. We set the speed to SP as the Mini DV tapes are
inexpensive. These days data storage is plentiful and cheap, we
have tons of hard disk capacity and save edited video to DVD anyway.
PCM 16 bit/12 bit sound - The lower 12
bit sound quality allows a second stereo track to be dubbed to tape
after filming, eg to add a commentary. As we can edit footage
during post production on the computer, we had no need for this feature
so set this to 16 bit.
Wide/4:3 - The camcorder can record
both video and stills with a 16:9 widescreen aspect ratio. We found the
image actually wasn't any wider, just shorter. Although it looked
good, in fact it records less data to tape or SD card. With 16:9
the digital stills pixels reduce from 3.1 to 2.4 megapixels, a serious
reduction here. Again, we can easily crop video or stills during
post production if necessary, so we set this to 4:3.
Mic settings - The on-board microphone
has a wind noise reduction and zoom function. We found the wind
cut only marginally effective (see later) and the zoom mic - it
supposedly zooms in the sound to the subject with the picture - rather
useless as it had an adverse effect on sound quality. We decided
to only use these when necessary and investigate using a stick-on wind
jammer or an external mic - with fluffy wind gag - clipped onto the
accessory shoe.
OIS -The camera has an Optical Image
Stabiliser which works well at reducing camera shake so we set this on.
Zoom ratio - The optical zoom runs up
to 10x, the digital zoom can be set to max out at 25x or 700x.
Needless to say the 700x looks like a blurry blancmange! Normally
we steer clear of digital zooms, but the picture does stay reasonably
vivid up to 25x so set this as the maximum. Of course we don't
have to zoom this far, but it's available if needed.
Scene mode - The camcorder has five
program exposure modes, the only effective one seemed to be low light
mode, the others either over exposed or caused focusing problems.
Other settings - We decided to try out
the manual overrides for exposure, focus and white balance, the colour
night view, backlight mode, AGS, Quick Start and others during live
usage.
Digital stills settings and quality
The hybrid nature of the camcorder with a built-in 3.1
megapixel digital stills camera was a big influence in our buying
decision, so we experimented with this fully. We took pictures of
the same mixed scene at various settings from the basic 640x480px
(0.3mpx) to 2048x1512px (3.1mpx) and the two JPEG compression
settings. Our mixed scene on a sunny summer's day looked across a
road and included, er, the road, trees, grass, a car, a brick wall and
a house with name sign. Not very exciting, but a good test.
We analysed the resulting images on the computer.
Initially the images looked good on screen at all settings
except the lowest, especially with the higher compression.
However, in reality you wouldn't take pictures at 640x480px unless for
emailing. All the images looked a little over-exposed (taken on
auto exposure) on our gamma calibrated system. Closer inspection
revealed a drop off in quality across our images as you would expect
dependant on the quality settings. We then zoomed in and started
finding problems. Even on the highest possible quality setting
there was a lack of definition, with highlights bleached out and shadow
areas with no detail. We couldn't read the well-lit house
sign. Further, we noticed a speckled effect (image noise) on
areas of solid colour, such as the blue sky. In case we were
expecting too much, we took the same scene on our ageing 2 megapixel
camera and compared. The 2mpx image (file size 756KB) was rather
better than our 3.1mpx (1324KB) one, none of the highlight/shadow
issue, it was sharper, better exposed and no speckling was evident on
the sky. Even the house sign was almost readable! This
result was disappointing and didn't correspond with the good reviews in
the magazines. Now we know 3.1mpx hardly sets the pulse racing
these days, but it should be better than this! Hmmm...
Now you may wonder why we haven't displayed our images on this page to
demonstrate our findings. At the time we were so disappointed we
deleted the images, in any case web images are much smaller and highly
compressed so the effects wouldn't be seen anyway. However, we do
have plenty of images taken with the camera among our Somerset holiday images and
across our post June 2006 image gallery pages.
In conclusion we set the camera to the highest possible
quality, 3.1mpx and minimum compression. As with video media,
data storage is cheap and plentiful and more pixels means more headroom
for image manipulation later. We archive our digital images to
CD-R and so re-use the SD cards. Incidentally, only basic EXIF
information is embedded in the JPEG files unlike a dedicated digital
camera.
DV Video quality
In contrast to the stills quality we had no such problems
with video, more on this next...
We have a number of video clips available to view where referred to in
the following text.
 In use on holiday In use on holiday
So off to Somerset then, and with some trepidation after the poor
digital stills results. On our first day we used the camcorder
visiting Street and Glastonbury.
The joystick controls the often needed functions while the menu button
the less used ones. In use the controls fall readily to hand
which makes it a doddle to make changes when out and about.
Switching between video and stills was just a click on the mode dial.
The camera can save digital stills to card during videoing or playback,
but only at 640x480px resolution - adequate to prepare web images but
not for print. As we prefer not to risk spoiling our video by
trying to multitask (even Belinda has a problem and she's a woman!), we
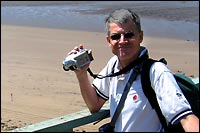
tried saving some stills from video later. The image shown here -
Mike doing a gorilla impression(!) outside the Information Centre in
Street - was obtained in this way as were others in our Somerset image
gallery (identified by a letter appended to the file name, eg. 'b',
'c').
|
Problems with light
On day two we toured the Fleet Air Arm Museum and several
problems manifested. The mixed 'effect lighting' inside the
museum caused the auto white balance to get confused and we resorted to
setting it manually. No great sweat, but Belinda's Canon digital
camera had no such problem. The bigger issue was with low
light. We found the Panasonic just couldn't take a decent still
picture under lighting which was not a problem for the Canon. We
tried using the low light setting and backlight compensation, but with
only partial success. Analysing the images after we came home it
transpired that it couldn't set a shutter speed lower than 1/50th and
after it ran out of iris it increased the video gain, and for gain read
grain! Not looking good for the digital stills again then!
We can enhance our images on the computer of course, but it's better to
take good ones in the first place. Our Fleet Air Arm video clip
demonstrates the video performance in the museum.
|

Poor exposure and white balance under low & mixed lighting.
|
Every night at the cottage we assessed the battery charge
situation. We were finding one fully charged battery would last
the day out, despite using the power zapping LCD screen. A
typical day's use for us involved taking around 40 stills and
collecting around 15 minutes of video with perhaps twice that time (30
mins) spent in rec standby. No complaints about battery life
then! Another good point was the ability to play our footage back
in camera with sound as there's a miniature speaker. Then it
could be set to locate the next sequence of unrecorded tape ready to
continue shooting using the blank search feature.
 Problems with wind (and it wasn't
the curry the night before!) Problems with wind (and it wasn't
the curry the night before!)
We walked across the Brean
Down peninsula to an old fort on a hot, sunny but windy day.
It was no problem using such a small and light camcorder under those
conditions and our footage was excellent visually.  Later playback would
show the auto-focus to be quick and decisive and the complete lack of
handling and camcorder operational noise (our fingers on the camera and
motors running) was a refreshing change from our previous video cameras. Later playback would
show the auto-focus to be quick and decisive and the complete lack of
handling and camcorder operational noise (our fingers on the camera and
motors running) was a refreshing change from our previous video cameras.
However, we discovered just how good the mic was at picking up wind
noise, it often blew away our commentary (see our Brean video clip) and this
despite the wind cut filter on! Back to the good points though,
the LCD screen can be twisted round 180 degrees and this enabled us to
capture ourselves on the beach enjoying an ice cream after the
walk. Yum!
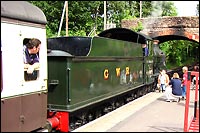
No problems with shaking
Now Mike makes out he's not a steam buff, but he did spend a lot of
time filming the steam train on the West Somerset Railway! The
OIS (Optical Image Stabiliser) came into its own here - on the old
train it effectively reduced the inevitable camera shake (WSR video clip). Just
got to sort Mike out now then!
 The Cheddar Gorge Caves proved a
severe test of the camera's low light and colour balance capabilities
and tended to confirm our earlier findings. Of course we can use
the built-in flash, but this only illuminates a few meters in front of
the camera and rather spoils the moody cave lighting. We tried
out the colour night view (it sets a 1/2sec shutter speed) and while it
allowed us to capture well exposed video, any movement either with the
subject or camera caused a severe ghostly effect (Cheddar video clip). The Cheddar Gorge Caves proved a
severe test of the camera's low light and colour balance capabilities
and tended to confirm our earlier findings. Of course we can use
the built-in flash, but this only illuminates a few meters in front of
the camera and rather spoils the moody cave lighting. We tried
out the colour night view (it sets a 1/2sec shutter speed) and while it
allowed us to capture well exposed video, any movement either with the
subject or camera caused a severe ghostly effect (Cheddar video clip). 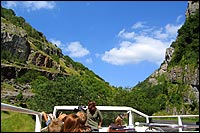 This ruled out
camera panning or people movement in the shot, an impossibility at a
tourist attraction! The colour night view setting doesn't extend
to digital stills unfortunately, if it did this would help with the
photo's exposure problem. This ruled out
camera panning or people movement in the shot, an impossibility at a
tourist attraction! The colour night view setting doesn't extend
to digital stills unfortunately, if it did this would help with the
photo's exposure problem.
We thought the camcorder had developed a fault when it stopped
while filming the vertical Gorge face, it took a while before we
realised the AGS (Anti-Ground Shooting) was cutting in. It seems
this feature prevents filming when aiming up as well as down!
After this we left the AGS off as it spoiled our shot!
Above left. The West Somerset Railway and right,
filming near vertically up the Gorge from the topless tourist bus.
|
The Power LCD button was useful in bright sunshine.
|
Beeping and zooming
Our hot climb up to the top of Glastonbury Tor in the bright
sunlight caused us to use the Power LCD button. This increases
the screen brightness and proved very effective at enabling us to see
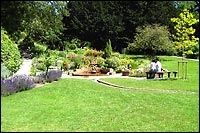
the LCD in the direct summer sunshine. After the hot climb down
we visited the Chalice Well
Gardens and it's such a silent, peaceful place we were embarrassed
by the various beeps and shutter effect noise made by the
camcorder. The ability to switch them off in the menu was a
godsend here!
 Later still we looked round Glastonbury Abbey and tried the
zoom mic, zooming in on a tour guide in the middle distance taking a
group round - see final video
clip. Although the sound did appear to close in, the
reduction in quality was quite objectionable. In fact, the sound
proved a little disappointing generally as it lacked stereo separation
- what the audiophiles would term soundstage. We've experienced
better from our previous video cameras. Later still we looked round Glastonbury Abbey and tried the
zoom mic, zooming in on a tour guide in the middle distance taking a
group round - see final video
clip. Although the sound did appear to close in, the
reduction in quality was quite objectionable. In fact, the sound
proved a little disappointing generally as it lacked stereo separation
- what the audiophiles would term soundstage. We've experienced
better from our previous video cameras.
|
To finish on a good point though, the proportional zoom was
excellent. It allows a variable zoom speed dependent on the
pressure applied to the lever. Have to be careful not to suddenly
change pressure and hence speed half way through a zoom though.
Any other points
We've not covered or tried all the features offered by the
Panasonic NVGS280 camcorder. For instance it has a continuous
photoshoot, but this is of little interest to us as the images can only
be captured at the lowest picture size of 640x480px. Similarly
the Quick Start is of little interest as we rarely need to film
instantly.
We did try the self-timer, flash red eye reduction, fade in/out and the
remote control which all work as expected. We also tried the
manual settings, particularly using the shutter/iris to reduce the
digital stills exposure as on auto it tends to over-expose
outdoors. The manual focus is so imprecise to use we try to avoid
it, but fortunately the auto focus is decisive so there's no need
anyway. The only time it's been needed was when trying to shoot
through fence netting at Monkey
World, the auto tended to focus on the netting and not the monkey
beyond.
We've not loaded the supplied PC video editing software. It's not
Mac compatible and looks fairly basic, but our existing editing suite
is undoubtedly better anyway.
|
Good Points...
|
Bad Points...
|
- Video quality
- Battery life
- Lack of motor/handling noise
- Easy to use
- Optical Image Stabiliser
- Power LCD brightness
- Proportional zoom
|
- Poor digital stills quality
- Poor stereo soundstage
- Ineffective wind filter
- Indecisive auto white balance
- PC editing software not Mac compatible
- Shoulder strap attachment to hand grip has high
stress concerns
|
Overall conclusions
While the Panasonic NVGS280 digital camcorder packs in an excellent
video performance, no way can the same be said with its digital stills
abilities. The photos taken by this hybrid model just don't cut
the mustard. We later had an opportunity to try out the higher
end NVGS500, with 4.1mpx stills and we saw the same defects. So
this looks like a general failing of the model series. At the end
of the day, we feel hybrid camcorders are predominately a video camera
and the incorporated digital stills camera a poor value 'bonus'.
Hmmm...
Not all is rosy with on video side however. The sound can
disappoint with its lack of stereo effect and poor wind cut
abilities. This would more than likely be resolved by using an
external mic clipped onto the accessory shoe, although this would make
it more cumbersome to carry around for casual use (see update for more on this).
Please see our edited Somerset video clips taken
with the camcorder.
We've added updates
to this Panasonic Camcorder review in following years.
See the current Panasonic camera range
at: https://www.panasonic.com/uk/consumer/cameras-camcorders.html
Video camera related resources (last checked/updated 2026):
Digital Trends - American but some handy info here.
CNET - camcorder (and other consumer electronic)
product reports.
Review Centre - major brand digital camcorder
reviews.
TechRadar - latest video camera reviews and news.
Please inform us if you find deadlinks
above.
© micbinks 2006. Please ask permission if you
wish to reproduce any of our content.
|

